Run your own AI provider
Deploy an OpenAI-compatible AI endpoint on your own Cloudflare account - in the browser at open.notebooker.ai or from source - and point Notebooker at it.
Notebooker can use any OpenAI-compatible endpoint as an AI provider. If you’d like to run the models yourself - for cost control, data residency, or just to tinker - we make it easy to deploy one to your own Cloudflare account, backed by Cloudflare Workers AI. The free plan includes a daily allowance of inference, so you can try everything without a card.
There are two ways to do it: the hosted deployer at open.notebooker.ai (nothing to install), or running the same open-source app locally. Both deploy the exact same worker.
What it deploys
A Cloudflare Worker in your account that exposes an OpenAI-compatible REST API:
GET  /v1/models               list configured models
POST /v1/chat/completions     chat / language model (incl. vision models)
POST /v1/embeddings           embeddings
POST /v1/audio/transcriptions speech-to-text
POST /v1/audio/speech         text-to-speech
Each endpoint is enabled only if you’ve configured a model for it.
Option 1 - open.notebooker.ai (nothing to install)
Open the deployer at open.notebooker.ai →
- Prepare your Cloudflare account (one time): verify your account email,
and visit Workers AI in your dashboard
once so your
workers.devsubdomain gets registered. - Create a scoped API token at dash.cloudflare.com → API Tokens (Custom Token, scoped to your account): Workers Scripts: Edit, Workers KV Storage: Edit, Workers AI: Read, Account Analytics: Read.
- Paste the token at open.notebooker.ai, pick a model for each slot from the live Cloudflare catalog, and hit deploy.
- Test it right there - streaming chat, text-to-speech, speech-to-text (upload audio/video), vision (upload an image), and embeddings similarity - and watch your estimated free-tier usage.
- Save your credentials: copy the base URL and bearer key, or click download credentials.txt. You’ll paste these into Notebooker below.
A few things worth knowing:
- Nothing is stored on our side. Your Cloudflare token lives only in an encrypted cookie that expires with your session - delete the token in Cloudflare when you’re done, and create a new one next time. Your endpoint’s API key is never stored either: save it when it’s shown (or download the credentials file). If you come back without it, paste the saved key in, or renew it (which replaces the old one).
- Model changes are safe - redeploying with different models never touches your API key.
- Gated models: some Meta models (e.g.
llama-3.2-11b-vision-instruct) require a one-time license agreement per Cloudflare account. If chat replies with a license notice, send the single messageagreeonce and you’re set.
Option 2 - run the deployer locally
The deployer is open source -
cloudflare-ai-deployer
- and the hosted app is the same code, so you can run it on your own machine (Node.js 18+):
git clone https://github.com/Notebooker-ai/cloudflare-ai-deployer
cd cloudflare-ai-deployer/web
npm install
npm run dev            # http://localhost:4321
Then follow the same flow as Option 1 on your local instance: paste your scoped token, pick models, deploy, test, and download your credentials. See the repo README for the architecture and how to deploy your own hosted instance.
Point Notebooker at it
In Notebooker:
- Go to Settings → API keys and Add credential → OpenAI Compatible.
-
Fill in:
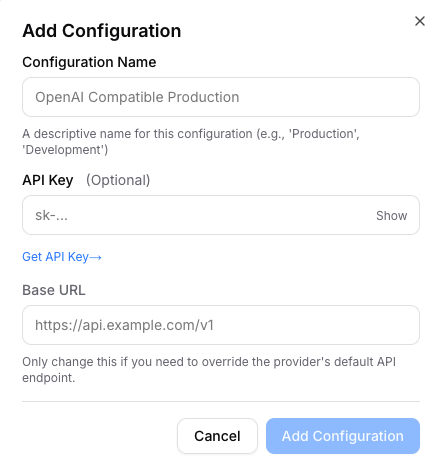
- Name - e.g. “My Cloudflare AI”
- API key - your endpoint’s bearer key
- Base URL - e.g.
https://cloudflare-ai.<your-subdomain>.workers.dev/v1
- Save.
- Go to Settings → Models, Add model, choose provider OpenAI
Compatible, and enter the model name matching a configured slot
(e.g.
chat,embedding,text_to_speech,speech_to_text).
Now select your model wherever Notebooker asks which model to use - for chat, embeddings, podcasts, and creators.
Requests to your own endpoint run on your Cloudflare account’s Workers AI allowance, not your Notebooker credit - Notebooker only counts Notebooker AI and service usage.
Verify the endpoint any time with:
curl https://cloudflare-ai.<your-subdomain>.workers.dev/v1/models \
  -H "Authorization: Bearer <your-api-key>"
Related
- Notebooker TTS voices - using the speech model.
cloudflare-ai-deployeron GitHub